How to Blow Out Sprinklers for Winter
Begin the process of blowing out the lines by closing the backflow valves to help direct the flow of air in the opposite direction. With the farthest or highest sprinkler zone open, turn on the compressor and begin to add air to the sprinkler system. Slowly open the compressor valve, gradually adding additional air pressure as needed. When the pressure is sufficient, you should start to see water coming through the sprinkler head. The air pressure should not exceed 80 PSI for PVC piping or 50 PSI for polyethylene piping. Continue to blow water out of the sprinkler heads in the first zone until the spray of water ends, then open the next furthest or highest sprinkler zone and close the first zone. Move through each zone until all sprinkler zones have been blown out. Repeat this process at least one more time to ensure that all water has been blown out of the system, then turn off and disconnect the compressor.
How to Blow Out Sprinklers Before Winter
Your sprinkler system is a worthwhile investment that needs adequate care and maintenance.
As the freezing winter season approaches, it’s critical to put your sprinklers to bed. Doing so prevents water freezing inside the irrigation pipes and system components which could cause cracks or damage.
Blowing out your system is one of the best methods to ensure your irrigation system is completely dry.
Thankfully, with some know-how, it’s not a complicated task. This step-by-step guide will walk you through the process.
Why Use the Blow Out Method to Winterize Your Irrigation System?
Before we start, let’s talk about why the blow out method is the best for winterizing your system.
The blow out method entails blowing in air at high pressure into the pipes to force all the water out of the irrigation system. The pressurized air pushes any water left in the lines and discharges it through the sprinkler heads.
There’s no chance of any water remaining in the piping, making it the preferred method for winterizing your irrigation system.
With the other methods like the automatic and manual drain methods, there’s no way to ensure that there are no trace amounts of water left inside the pipes.
Leaving even the smallest amount of water poses the risk of cracking or rupturing the irrigation system when the water freezes and expands.
Apart from not eliminating all the water, other draining methods may not always be reliable because underground pipes can move with time.
As the lines shift, they will cause the angle of drainage to change, affecting the gravitational flow of water. This will mean that the water may not drain out.
How to Blow Out a Sprinkler System
Here’s how to blow out and winterize your irrigation system.
Step 1: Shut off the Main Water Supply and Drain
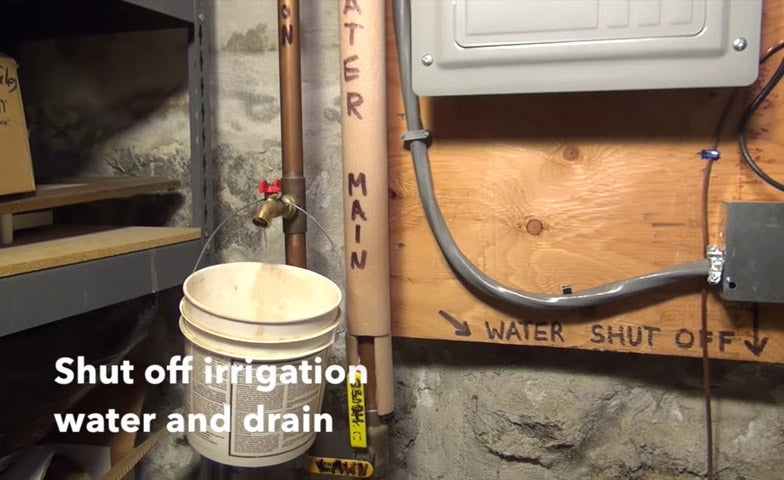
Before you proceed, you will need to turn off the main water supply. This ensures that no additional water flows into the piping.
Once you turn off the water, you’ll also need to open the hose bib on the main water supply that’s connected to the irrigation system to let the remaining water drain out.

Image courtesy
Step 2: Switch off the Timer

Orbit – 58910 – 1-Dial 2-Port Hose Faucet Timer
If your watering system uses a timer, you will need to shut it down. This reduces the risk of electrical or mechanical faults while the irrigation system is offline.
Depending on the type of timer you use, you can also set it to rain mode. That way, your programming will remain unchanged, and you can simply set it back to how it was after the winter.
Step 3: Attach the Compressor
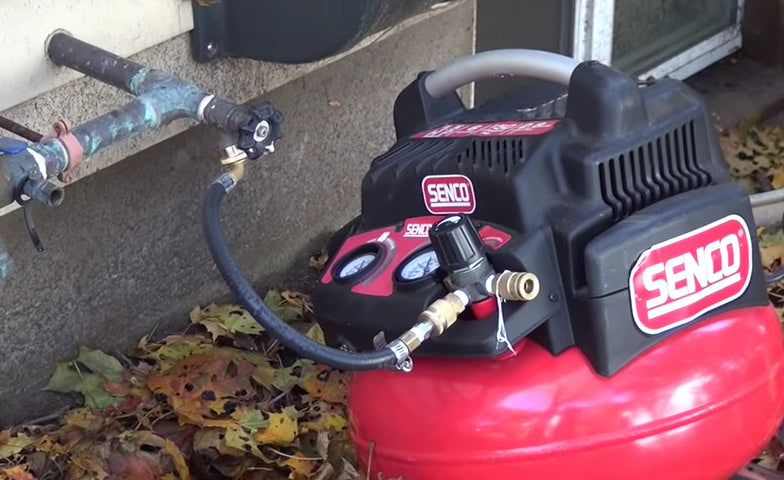
Now you’ll need to attach the air compressor to the irrigation system. You will need a flexible hose to connect the compressor (using a coupler).
Close the airflow valves on the compressor and attach the coupler to the end of the air compressor hose, in turn attaching it to the air compressor blow out adapter on the irrigation system.

Image courtesy
Which Type of Air Compressor Should I Use?
To blow out a sprinkler system properly, your air compressor should provide a volume of at least 30-50 cubic feet per minute (cfm).
Smaller compressors will not be able to blow air through the underground piping over a long distance. You’ll need to buy or rent a large enough compressor for the job.
Apart from the volume, the compressor must be able to blow pressure at between 40 to 80 pounds per square inch (PSI)
Note: the air pressure should not exceed 80 PSI if you have PVC piping or 50 PSI for polyethylene irrigation systems to avoid damaging the components. Excessive pressure can cause the pipes to burst open.
Step 5: Blow Out the Sprinklers
Ensure that you blow out the zone farthest from the mainline first. This will ensure that you can adequately complete a zone-by-zone blow out.
If your system is on uneven terrain, start your sprinkler blow out with the higher level zones first. The higher zones may need higher pressure, so you need to get them out of the way before lowering the pressure on the compressor.
Close the backflow valves on the irrigation system, then turn on your compressor, keeping your eye on the pressure.
Note: turn the compressor on very slowly and gradually increase the pressure until you reach the recommended PSI requirement for your sprinkler system.
Once the lines start filling up with air, you will see the water coming out of all the water taps attached to the sprinkler line. When all the water sprays out of the open taps, close all of the taps except the one that’s attached to the air compressor.
Remember these important sprinkler blow out safety tips:
- The extremely high pressure of compressed air can be dangerous, so ensure you wear safety glasses.
- Don’t look directly over the sprinkler heads to avoid taking a hit from the pressurized air or debris.
Now starting with the irrigation head farthest from the compressor, turn on each sprinkler head. Do this for all the sprinkler heads as you work your way towards the main water line. Shut off each head when it stops spraying water.
Alternatively, you can turn on each zone manually or on the controller. Wait for the water spray to stop, then turn off that zone and proceed to the next.
Take care not to blow out each head or zone for longer than you need to. Once the water spray stops, you need to close immediately.
Once you’re done blowing out sprinkler-by-sprinkler or zone-by-zone, close the shut-off valve on the compressor.
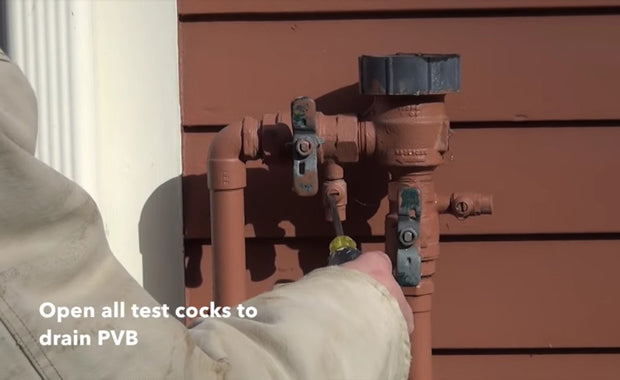
Then alternately open and close the backflow device valves a couple of times to release any pent-up air pressure.

Image courtesy
And that’s it — you’re done. Your irrigation system is now ready to take a break for the winter.
Here’s a step-by-step video you can refer to:
Remember to insulate all the above-ground fixtures of your irrigation system to prevent them from freezing.
Get the Best Tools for Your Blow Out
Using the right tools will make the job easier. Visit the Sprinkler Supply Store to get all your sprinkler equipment.
We have a wide range of tools and accessories, and if we don’t have them in stock, we’ll source them especially for you.
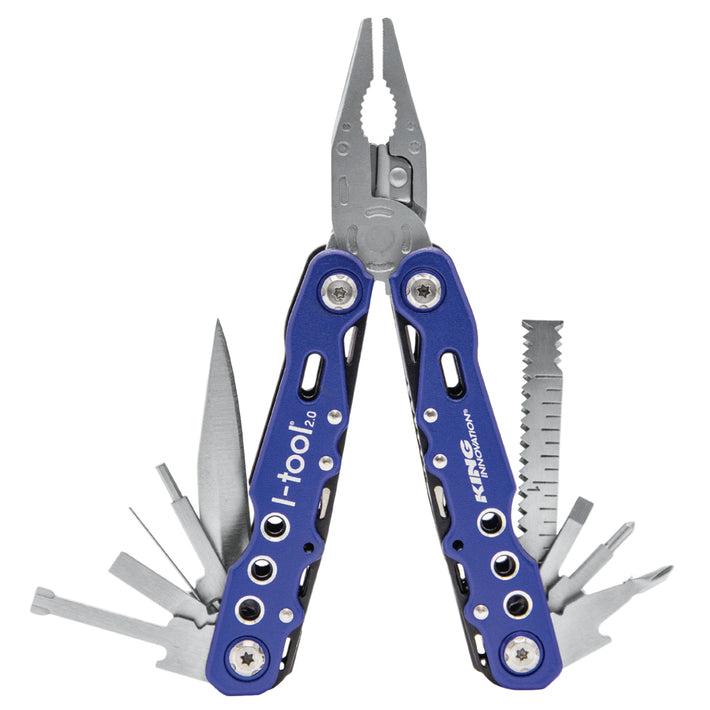
Check out this irrigation multitool, for example. It will come in handy to open and shut most valves or screws on your irrigation system.

King – 46600 – I-TOOL Irrigation Multi-Tool with Carrying Case
Don’t wait. Get in touch with the Sprinkler Supply Store today for excellent service and a wide range of tools and supplies to winterize your system. Don’t take our word for it,here’s what other happy customers had to say:

Customer Review
How to Blow Out Sprinklers for Winter
Timothy Dale is a home repair expert and writer with over a decade of hands-on construction and home improvement experience. He is skilled in residential, commercial, industrial and institutional plumbing, electrical, carpentry, installation, renovations, and project management.
:max_bytes(150000):strip_icc()/headshots_FINAL_richard-epstein-f8215c1d54fa47b99d0df8f410ffbfc4.png)
Richard Epstein is a licensed master plumber with over 40 years experience in residential and commercial plumbing. He specializes in estimating as well as design and engineering for plumbing systems, and he works for one of New York’s largest union plumbing construction companies.
:max_bytes(150000):strip_icc()/estep1-670b90841fa446c1b2172fa053a5fe19.jpeg)
Emily Estep is a plant biologist and journalist who has worked for a variety of online news and media outlets, writing about and editing topics including environmental science and houseplants.
:max_bytes(150000):strip_icc()/how-to-blow-out-sprinklers-for-winter-2508-hero-0c173c50533248ebb0b92fc509299789.jpg)
- Working Time: 30 mins – 3 hrs, 30 mins
- Total Time: 1 – 4 hrs
- Skill Level: Intermediate
- Estimated Cost: $80
In-ground sprinkler systems are incredibly helpful for keeping the grass and garden looking great during the warm months of the year, but when the temperature drops, the water within the buried hoses and pipes is likely to freeze, forcing the pipe to expand and crack. Rigid PVC pipes may burst entirely, instead of developing slow leaks, which is more common with flexible polyethylene pipes.
Tip
This project describes one type of set-up, but there are other types. In some irrigation systems, the irrigation boxes are in a box in the ground, with a reduced pressure zone to protect the local water supply. Note which type of set-up you have before proceeding.
To help prevent damage to your sprinkler system, it’s important to shut off the flow of water to the system. You also need to make sure to drain the water out of the pipes, so they remain empty throughout the cold winter months. Learn how to blow out your sprinkler system, protecting the lines from cracks and leaks.
Warning
Only attempt to blow out your sprinkler system if you have experience working with an air compressor. An air compressor can cause extensive damage to the sprinkler system and could put an inexperienced user or others at risk if the air pressure makes the water line burst.
What You’ll Need
Equipment / Tools
Blow Out Method
- Bucket
- Channel lock pliers
- Air compressor
- Air compressor water blow out adapter
Manual Drain and Automatic Drain Methods
Instructions
Blow Out Method
:max_bytes(150000):strip_icc()/how-to-blow-out-sprinklers-for-winter-2462-tools-cae8185a3e8f4bf1b8fc9911ff06f71c.jpg)
Shut Down and Drain the Water Line
:max_bytes(150000):strip_icc()/how-to-blow-out-sprinklers-for-winter-2464-step-01-95cea369f083404e983506b14000cebc.jpg)
Begin the process of winterizing your sprinkler system by turning off the isolation valve to the sprinkler system to prevent water from the main line from flowing into the pipes. There will be a hose bib (small faucet) located after the isolation valve, either inside the home or outside before the backflow preventer. Place a bucket underneath this faucet, then open the hose bib to drain the water from the main sprinkler line.
Turn off the Timer
:max_bytes(150000):strip_icc()/how-to-blow-out-sprinklers-for-winter-2467-step-02-54882c28f37c4e5aba026a7169f7fc9f.jpg)
Not all sprinkler systems run on a timer, but if your system does have a timer, then it’s advised to shut it down. The reason for this is to help protect the timer and the sprinkler system by reducing the risk of electrical or mechanical faults throughout the winter. Some timers can also be set to rain mode, which tells the timer that it’s raining and it doesn’t need to come on. This allows the programming to remain unchanged, and when the spring rolls around again, you can simply turn off rain mode to resume your regular watering schedule.
Connect the Air Compressor
:max_bytes(150000):strip_icc()/how-to-blow-out-sprinklers-for-winter-2473-step-03-097246c0512b40bcacd624f0deb26ebe.jpg)
In order to blow out the sprinkler system, you will need an air compressor that can produce air at a volume of at least 30 to 50 cubic feet per minute (cfm) and at pressures of 40 to 80 pounds per square inch (PSI). Close the airflow valves on the compressor and attach the air compressor to the irrigation system with an air compressor blow out adapter. These adapters are regularly used for winterizing RVs, so they should be relatively easy to find.
Open Sprinklers
:max_bytes(150000):strip_icc()/how-to-blow-out-sprinklers-for-winter-2486-step-04-87f0cb90b34345de99a280e8061b1617.jpg)
Even a powerful air compressor isn’t capable of blowing out the entire system without risking damage to the pipes and sprinklers, so you will need to open each zone of sprinklers, one at a time, starting with the furthest zone. Opening the sprinklers provides a path for the air to travel and it will allow the water to escape instead of building up pressure inside a closed system. By starting with the farthest zone from the main line you can ensure that the entire irrigation system is adequately empty with a zone-by-zone blow out. The only exception to this is if the yard includes uneven terrain, like small sloping hills. In this case, start with the sprinkler zone that is on the highest level first.
Blow Out Sprinkler Line
:max_bytes(150000):strip_icc()/how-to-blow-out-sprinklers-for-winter-2481-step-05-c239657ebb0d4e86b6f6f6350966f243.jpg)
Begin the process of blowing out the lines by closing the backflow valves to help direct the flow of air in the opposite direction. With the farthest or highest sprinkler zone open, turn on the compressor and begin to add air to the sprinkler system. Slowly open the compressor valve, gradually adding additional air pressure as needed. When the pressure is sufficient, you should start to see water coming through the sprinkler head. The air pressure should not exceed 80 PSI for PVC piping or 50 PSI for polyethylene piping. Continue to blow water out of the sprinkler heads in the first zone until the spray of water ends, then open the next furthest or highest sprinkler zone and close the first zone. Move through each zone until all sprinkler zones have been blown out. Repeat this process at least one more time to ensure that all water has been blown out of the system, then turn off and disconnect the compressor.
Release Remaining Air Pressure
:max_bytes(150000):strip_icc()/how-to-blow-out-sprinklers-for-winter-2505-step-06-1a0ec8c85d5f4da895bd92c128a030bc.jpg)
Open and close the valves on the backflow preventer and on the manual drain valves to release any air pressure that is still remaining in the system, then close the valves to keep the sprinkler system isolated for the winter. The irrigation pipes and sprinkler heads should now be clear of any water, preventing them from freezing in the winter weather.
Manual Drain Method
There are some irrigations systems that come equipped with manual drainage, allowing you to empty excess water from the system by opening the drain valves.
- Shut down and drain the water line: Start by turning off the isolation valve to the sprinkler system. Once this valve is closed, look for the hose bib or small faucet located down the line from the isolation valve. It can be either inside the home or outside before the backflow preventer. Put a bucket under the faucet and open the hose bib to start draining the water from the main sprinkler line.
- Locate the manual drain valves: If you have drained the irrigation system before, then you should be familiar with the layout. For those that have never worked with the sprinkler system, look for manual drain valves at the ends of the piping, as well as any low points of the piping. You may need to raise the sprinkler heads to improve draining if the system is equipped with check valves. These valves only allow water to flow one way, so raising the sprinkler heads gives the water an additional outlet for draining.
- Drain the system: Open all manual drain valves and raise the sprinkler heads, if necessary. Water should begin draining out of the sprinkler system. Use a set of channel lock pliers to gently loosen any valves that seem tough to turn. Also, make sure to drain the backflow device to prevent water from freezing and damaging the internal components of the backflow preventer.
- Close all the valves: It may take several hours for all the water to drain out of the system after opening the valves. When no more water is draining from the valves, close all valves and lower any sprinkler heads to complete the winterization process.
Automatic Drain Method
Some sprinkler system manufacturers have started incorporating device to make the winterizing process more convenient. Auto drain systems have valves that automatically drain water from the pipes when the pressure falls below a specific number of pounds per square inch.
- Shut down and drain the water line: Begin this task by turning off the isolation valve to the sprinkler system. Look for the hose bib or small faucet located after the isolation valve, then place a bucket under the faucet and open the hose bib to drain water from the main sprinkler line. Hose bibs are typically found outside before the backflow preventer, though they can sometimes be installed inside after the isolation valve.
- Run one sprinkler head to relieve pressure: In order for the automatic sprinkler system to begin draining, you need to reduce the internal pressure. Do this by running one sprinkler head. Since the isolation valve for the system is closed, no additional water will be added to the sprinkler system, allowing the open sprinkler head to relieve the pressure throughout the water lines.
- Wait for automatic draining to finish: Once the pressure drops below the specific number of pounds per square inch as indicated by the manufacturer, automatic draining should begin. The automatic drain valves will open, clearing the pipes of excess water. However, if the sprinkler heads are equipped with check valves, then you may need to raise the sprinkler heads above ground to drain them individually.
- Close all the valves: Give the system a few hours to empty the remaining water. After confirming that the entire system is drained, close any valves to prevent water from entering the sprinkler system during the winter months.
It’s a good idea to keep the PSI below 50 to avoid damaging the irrigation lines. However, you may be able to use as much as 80 PSI for thick PVC piping, while 50 PSI should be the maximum for polyethylene piping.
Blowing out a sprinkler system doesn’t take a lot of time. Generally, you should only spend about two minutes blowing out each zone, though it’s important to ensure that the lines are running clear before moving on. You can comfortably move to a different zone once the spray of water coming out of the irrigation line turns to air.
When should you blow out the sprinklers for winter?
Generally, the goal is to blow out the sprinklers before the temperature can drop low enough to freeze the water in the lines. This means you should have the sprinkler system winterized before the temperatures drop below 32 degrees Fahrenheit. Consider getting this job done in the early fall to ensure the sprinkler system is winterized by the time the temperatures plummet.